DEVELOPING DESIGN IDEAS INTO WEAVING

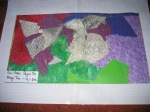 At last source material from Part Three: Project Six, that lends itself to being woven.
Stage Two of Part Four – developing ideas suggests choosing source material that is not too complicated but has an expressive quality and rhythm. It talks about using part of the material, changing the colours, reorganising shapes and introducing plain, patterned and repeat areas.This was the subject of contention referred to by my tutor in assignment three. In this situation the source material did not require any of this development as it was perfect for being produced in woven form.
Took a short cut and had a coloured photo copy of the sample enlarged so that it fitted within the breadth and depth of the weaving frame. Stapled the image to a piece of graph paper to represent the outcome as if I had drawn the outline of each block on to the surface of the paper and then painted in the blocks with the equivalent colours. I could have used a light box to transfer the blocks or I could have drawn a grid over the blocks and then transferred the ‘marks/outlines’ to the graph paper. All methods would have achieved the same result. The colours were vibrant with some luminosity.
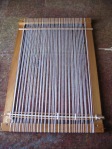
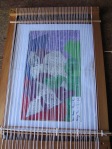 Decided to warp up the frame with the same number of strands of light weight yarn that I used for the first woven sample. Thought about changing to a different yarn type as well as variegated colours but decided to leave the variation untill a later sample. I was determined to avoid the problem of the warp threads showing above the weft threads and allow them to create the surface qualities by way of texture and type of yarn used.
Decided to try paper clips fastened to the lower warp threads and using a piece of dowel across the face of the frame so that I could simply pull the lower warp threads up above the top warp threads rather than bringing them up singly with a ruler. So frustrating picking up each warp thread and so time-consuming every second row of weft. Have now tried using a bevelled edge ruler and it works especially where there are a number of different colours along each row of weft.
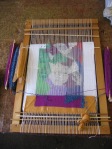 The design decisions were driven by the blocks of colour in the source material. Identifying and selecting the appropriate colour yarn came down to what I had available and what I could obtain from other sources. Here’s where looking at other students and artists work becomes overwhelming. You hit on an idea and then lo and behold find that some one else has got there before you. The paper clip idea worked for me until that is I got to changing the number of colours in each row. I fell back on using my trusty ruler to pick up each warp thread. It did have bevelled edges so that they slipped easily under each thread. Not so a blunt ended shed stick or bobbin. For this sample I used mainly knitting wools and frankly the constant back and forwards of the loaded bobbin was very satisfying. But trying to ‘but’ the ends of each colour alongside each other in a row was a nightmare. Ended up getting a book on tapestry weaving out of the local library. This proved to be very detailed but also very helpful because of its clear step-by-step approach. “Tapestry Weaving” by Nancy Harvey published by Interweave Press in 1991. The piece of work in the above photo took me two hours plus setting up time. So on the basis of the size of the frame there is another six or so hours to finish the piece.
In the book the calculations of how much yarn would be needed for any given piece of weaving were very precise and were much help in working out how much yarn would be needed to complete a piece of tapestry. My calculations were as per the formulas but my usage was anything but. Had something to do with the variables of skeinage and weight of yarns/fibres. Finding the volume of any given ‘object’ in the source material was questionable also. Another variable was the tension of any row of weaving especially when changing from one colour to another. Gaps started to appear between each warp thread and had to be basted together. Not sure how this will end up though when the piece of tapestry is cut from the frame.My samples in the beginning were looped alternatively around each warp before changing direction. I will be working to solve this problem as I weave further up the frame. Reverse weaving (unpicking) was my speciality at the beginning – but how else does one learn – only be correcting ones mistakes.
I have no intentions of changing the basic design only persevering with the weaving and correcting my mistakes. As the notes in the lesson suggest – you can only make a fair judgement when the design is completed – whenever that will be.
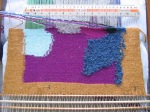 This sample is quickly become a case of perseverance and technique perfecting. Visually it can be seen where the matching and joining of colours could be improved as well as the tensions being equalised. Saying that the variation in the tensions are allowing for the creation of different textures as does the use of varying weights and types of woollen yarns. The time factor alone has led to being clearer in my mind as to a daily/weekly timetable in order to progress other parts of the lesson and keep the due dates for work and assignment presentation on course.
You must be logged in to post a comment.